A Cheesemaking Challenge
Last Updated September 29, 2017 · First Published March 1, 2012

My friend Annette Cottrell, author of The Urban Farm Handbook, is organizing a year-long “urban homesteading” challenge on her blog, Sustainable Eats. (You may remember Annette from her October Unprocessed guest post a few months back.)
For each month this year, Annette has picked a different topic and asked some friends to issue a related challenge. This month’s topic is home dairy.
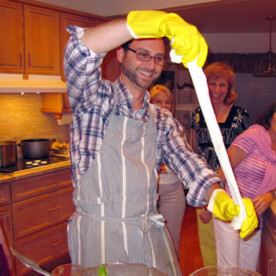
You probably don’t know this, but I’m somewhat of an accomplished home cheesemaker (okay, so I’m not that accomplished, but I have made a mean manchego). Before I started Eating Rules, I kept track of my dairy adventures at I Make Cheese (I’ve been so busy that I haven’t posted there in a while, sadly). I’ve made a fair number of cheeses, but I haven’t yet tackled the (intentionally) moldy ones, like camembert, brie, or roquefort.
Making cheese at home is probably far easier than you’d expect. Depending on the specific type, it can be anywhere from just a few short steps (chevre is ridiculously easy) to a lengthy process that involves pressing, waxing, and aging for months (patience is paramount when it comes to cheesemaking).
When I first started I was surprised to learn that most cheeses begin with the same ingredients and a similar process — it’s how, exactly, they are prepared. To oversimplify things a bit, it’s mostly a function of the timing and temperature for each step that changes the flavor, and then the aging brings out the flavor. Some cheeses do have different ingredients, of course, and may have different bacterial starters, or other specific cultures or molds added that will change the final result. When it first comes out of the press, a cheddar may taste the same as a jack or even a gouda. But once they’ve been aged for a few months? Then it’s a totally different story.
There are three main types of cheeses when it comes to home cheesemaking. First, the soft, devour-them-while-they’re-still-warm cheeses, like chevre, ricotta, or a “30-minute” mozzarella. Then there are the gooey, “bloomy-rind” cheeses, like camembert, which take only a few days to a few weeks until they’re ready. Finally, there are the hard cheeses like cheddar, which need to be pressed and then aged for at least two months to bring out the flavors.

The Basic Steps
Most cheesemaking follows a few simple steps, though of course it varies from cheese to cheese:
- Heating the milk
- Curdling the milk
- Separating the curds from the whey
- Cooking the curds
- Draining and/or Pressing
- Salting
- Aging (depending on the cheese)
Equipment
To make the basic cheeses — those instant gratification ones! — you only need a few tools, most of which are probably already in your kitchen. First is a good pot. For soft cheeses, a gallon of milk will generally yield about a pound-and-a-half of cheese (hard cheeses yield roughly a pound of cheese per gallon, since there’s less moisture in the final product). The recipe below calls for two quarts of milk. A 5- or 6-quart pot will do just fine.
Next is a dairy thermometer. Most cheesemaking doesn’t heat the milk above about 105 degrees, though some do bring the milk to near-boiling temperatures (don’t boil the milk or it’ll taste burned). A thermometer that reads in the range of 40 to 212 will be a good choice. Candy and meat thermometers have a range that’s too high. I use a relatively inexpensive digital thermometer (about $20), but when you’re just getting started, an analog one will do just fine and save you a few bucks.
After that, you’ll want to have cheesecloth or butter muslin. Butter muslin is very similar to cheesecloth, with a tighter mesh so less will slip through. (In a pinch, layering a few sheets of cheesecloth together often works just fine instead of butter muslin.) Note that you can easily rinse and reuse these cloths, they hold up surprisingly well.
Other items you’ll want to have handy include a slotted spoon (though any large spoon will do), measuring cups, and measuring spoons.
If you want to explore more, I recommend Ricki Carroll’s book, Home Cheese Making. She also runs New England Cheesemaking Supply, which is a good source for all your cheesemaking needs.

A Note on Ingredients
The most important ingredient in cheese is, of course, the milk. Above all else, be sure you do not use “ultra-pasteurized” milk — it’s been heated too high during the pasteurization process and won’t curdle properly. I have had success with Trader Joe’s Organic milk (it’s pasteurized, but not ultra-pasteurized).
Then you’ll need some kind of coagulant. This may be an acid, like vinegar, citric acid, or lemon juice. Or it may be an enzyme like rennet, which can come in liquid, tablet, or powder form. Traditionally, rennet is produced from the lining of a calf’s fourth stomach. I prefer to use a liquid vegetarian rennet (it’s produced from a fungus, which is far more palatable to me than calf stomach).
Some recipes call for a bacterial starter culture, which prepares the milk for the coagulant. This is a bit beyond the scope of this post, but be aware that you can buy freeze-dried, powdered starters that are remarkably simple to use. Or you can culture your own, and keep the culture going — just as you can with sourdough, kefir, yogurt, or kombucha.
Cheese isn’t cheese without salt. The salt functions in a variety of ways. For aged cheeses, it helps expel additional whey, drawing out more moisture from the cheese. It also acts as a preservative. Finally, it helps the flavor — unsalted cheese is remarkably bland.

The Challenge and a Giveaway!
If you’ve never made cheese before, this lemon cheese is a great place to start. If you have, then this may not be much of a challenge… but it’s still delicious!
It requires the bare-minimum of cheesemaking tools, most of which you probably already have, and doesn’t require any hard-to-find ingredients — it uses just milk, lemon juice, and salt. You could probably even get away with not using a thermometer — just be sure you don’t bring the milk to boiling.
So here’s your challenge: Make this lemon cheese! Once you do, snap a pic and share it on the Eating Rules and Sustainable Eats Facebook pages, and let us know how it went.
Annette is also doing a giveaway in conjunction with this challenge. To enter, you’ll need to give the challenge a try, and then leave a comment or a link on her roundup post at the end of the month.
Farmer Cheese
Ingredients
- 1/2 gallon Whole Milk, 2% will work, but produce a drier cheese
- 2 lemons, juiced, approximately 1/4 to 1/2 cup
- Approx. 1/2 tsp. Cheese Salt, any salt will do
- Finely chopped Herbs, such as chives, oregano, or lavender (optional)
Instructions
- In a large pot over medium-low heat, gently bring the milk to 175 degrees Fahrenheit. Be sure to stir frequently to keep from scalding the milk.
- Turn off the heat. Add about 1/4 cup of lemon juice and stir well. Let sit for 15 minutes.
- After waiting, the milk should be curdled, and the whey (the liquid) should be clear. If it's still milky/cloudy, add more lemon juice, stir gently, and give it a few more minutes. Depending on the acidity of the lemon juice, it may take quite a bit more. It won't hurt to use more, but if you use more than necessary, the final result will have a stronger lemon flavor.
- Line a colander with butter muslin and gently pour the curds into it. Allow it to drain for a few minutes, and then tie the corners of the muslin together to form a bag.
- Hang the curds to drain. I use a twist-tie and rubber-band combination to hook the bag over the kitchen faucet.
- Allow to drain for 1-2 hours, until it stops dripping and has firmed up a bit. (If you're in a hurry you can speed the process somewhat by squeezing the bag gently from the top down).
- Remove the cheese and mix in the salt and herbs to taste.
- Ricki says to store the cheese in the fridge for 1-2 weeks, but I guarantee it'll be gone long before then.


I made the cheese this weekend, and kept out half of it to drain more and press to make paneer… Now I need to figure out what to do with the whey – any ideas anyone?
You can use whey in all sorts of places. I use it in breadmaking, substituting whey for the water and/or milk. I’ll usually add an extra tablespoon of butter to the recipe to make up for the loss of fat if I’ve substituted for milk. I’ve also used whey in biscuit and pancake batter, and as a partial substitute for broth in making soups. That works better if the soup is going to have some milk or creaminess to it, since the whey isn’t totally clear.
You can also put whey in smoothies or shakes. Or drink it straight or with a little sugar since it’s really tart, kind of like a lemonade.
I usually keep my whey for future paneer-making (in place of lemon juice).
I find that it makes the next batch of paneer “softer”.
Hope that helped!
I accept your challenge, sha! Dawn, crackers at thrity paces! We duel until the first Yum!
just finished the cheese. so easy and tasty. i imagine thi is what little miss muffit ate
Thanks for the recipe–tried it today and it is delicious!
Making cheese was one of the challenges I was most loooking forward to! This looks like ricotta, cant wait to try it!
I have had dreams of making cheese for FOREVER, and I may take you up on this challenge! Really, the only thing that has stopped me is the presence of other projects, food-related or otherwise. Time to get off my butt and stretch some mozzarella, I think. Thanks for the inspiration!
Yes!
And I just clicked through to your blog — your header image made me laugh out loud. Love it!! 🙂
Chickensss iiiinnnnn spaaaaaaaaace!
Yes, it does help, and good to know I was doing it correctly. I’ll try again this month. Thanks!!!
I tried to make my own cheese during the Oct unprocessed challenge, and it took me forever because I was afraid to boil it.
Plus, I wasn’t sure if I was working the t-stat right. Do you hold the thermometer with the end touching the bottom of the pan, or sort of hanging out in the middle of the liquid? I tried to not to touch the bottom, but I wasn’t sure if I was doing it right.
I will have to try it again.
Don’t touch the bottom of the pot with the thermometer — it’ll give you a far higher reading. Best to hold it with the tip in the middle, so that it’s reading the actual temperature of the milk. (One of the pictures in this post shows me taking an actual temperature reading while cooking some mozzarella curds.)
Hope that helps!
I will be making this next week!
My then pre-teenage son and I made a similar recipe, but put garlic in with the milk. to die for!