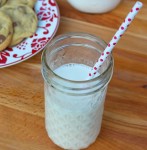
How To Make Almond Milk
Last Updated September 28, 2017 · First Published October 1, 2012

When I committed to October Unprocessed last year for the first time, I didn’t think it would be that big of a challenge considering how I eat already. I am a whole foods kind of girl. Already, when I go to my local co-op, I buy one-ingredient items or produce. I’ve already gotten into the habit of “processing” from scratch the foods I want to eat, such as condiments and bread.
But when the month began and I took a closer look at my daily food choices, I realized I had room to grow. I took on the challenge with gusto as an opportunity to learn how to make the processed foods I do indulge in. I came to realize that going unprocessed does not mean totally abandoning the foods I love or surviving a month of diet-like denial.
Often we buy processed foods out of convenience, thinking it would be too complicated, time-consuming or just plain impossible to make them from scratch. Well as it turns out, almond milk, a processed food I used to buy on a regular basis, is not. A product that used to come from the store in a tetra pak now sits in a mason jar in my fridge, with an ingredient list that consists solely of water and almonds.
A result of last year’s challenge has now become a seamless part of my weekly routine and a constant reminder of how easy and satisfying going unprocessed can be.
As far as the economic benefits are concerned, I was able to get about three cups of raw almonds out of a pound, which yields about three quarts of almond milk. Considering that I spent around $6 for the almonds and usually spend $2 – $2.50 on a container of almond milk, I pretty much broke even as far as cost was concerned.

However, the benefit that comes with making your own almond milk, besides the pride, is being able to make the quantity you want. Drinking a quart of almond milk can be a little bit of a challenge for one girl, but being able to make just a pint, which is not an option with commercially produced non-dairy milks, is priceless. Also, the almond paste bi-product I strain out makes a great, protein-tastic addition to a smoothie.
Let’s also consider packaging. Like I said, I was able to get three quarts of almond milk out of one package of Trader Joe’s raw almonds. So theoretically, I went from three rectangular containers to one plastic bag. Better yet, when I buy my almonds in bulk with my reusable produce sack, I’m down to no packaging at all! Score!
So, the verdict? Making your own almond milk is totally worth the effort and makes me happy every week! Check out this short video to see just how easy and fun it can be!
https://www.youtube.com/watch?v=-ANZ5XpuH5M

Almond Milk
Ingredients
- 1 cup raw almonds
- 4 cups water, plus more for soaking
Instructions
- Put the almonds in a mixing bowl and cover with water. Let sit for at least 6 hours.
- Strain the almonds and put in a blender with 4 cups of water. (It must be a blender, not a food processor – trust my previous experience on this one.) Blend for a full 2 minutes.
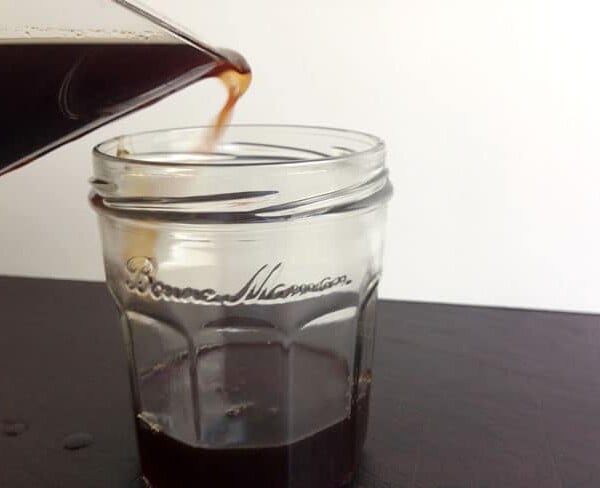
- Strain the blended mixture into a quart-size canning jar using a fine sieve. Press the solids through with a rubber spatula.
- Periodically, scrape the solids from the sieve (save them for smoothies) and rinse the sieve to enable more liquid to pass through.
- Strain the first liquid through the sieve again, this time without pushing the mixture through. What you end up with in that jar is your finished product – DIY Almond Milk!
- Enjoy within 5 days.
Nutrition
Stacy Brewer, teacher, artist, urban farmer, and self-proclaimed garden nerd, is committed to cooking with as many local and seasonal ingredients as possible and raising as much food as she can in her yard. She writes with heart and humor about all things gardening, preserving and crafting on her blog, Seattle Seedling.


Since it’s so easy, I like to make two batches of almond milk. One with just a little honey to sweeten it up, and another with two tablespoons for making chai tea. I bet it would make a great hot chocolate as well!
My daughter and I enjoy experimenting with different nuts and flavourings. One of our favorites is cardamom flavored brazil nut milk. We use the leftover pulp to make delicous dessert balls, by adding coconut, dates, and maybe a pinch more of cardamom and a wee grate of lemon zest. Oh So Good!
I love cardamom! I bet that is delicious!!
The leftover almond paste dries quickly in a dehydrator. Just spread on parchment paper, dry at 110 to 135 till dry. Store covered in the refrigerator. Add up to 1/4 of almond meal for flour in most recipes.
Hmm have a question – since it’s basically soaking and grinding/pureeing the almonds, would almond butter work? The kind that’s just already pureed almonds without salt or added stuff? The real kind would have the oil already mostly at the top and that can be drained off (to avoid a greasy milk). I can get that kind of thing easily (and it’s already ground down so it wouldn’t take as much to make what we need). I suppose we’d need to figure out how much of the butter to blend with water to create a milk-like product.
I’ve considered this before but we do go through more than just a pint at a time – I generally buy 3 or 4 of those shelf packs per week. Usually, it’s just 1/2 cup at a time on cereal but we’ve got several people eating cereal (and I eat it every morning, 7 days per week, so that’s 3 1/2 cups – almost a quart – every week for just my breakfast). When I priced it out, the cost of the almonds (enough to make an equivalent quantity of milk) was significantly higher than buying the shelf packs. This is one of the things I’ve got on my ‘considered exceptions list’ right now. I fully intend to double check pricing and see if I can find a way to get almonds cheaper but so far it’s been a no-go.
Great idea, Linda, on using up the almonds chunks. I might try mixing them with raw cacao and dates for something raw and fast… if they are not too gooey. Soaking the almonds now. We’ll see!
Another good way to use the solids that are left is to spread them out on a cookie sheet and toast them. I’ve taken these toasted grains of almonds, added a bit of almond oil and an even smaller bit of almond flavoring and mixed thoroughly with my hands. This, along with some sugar and egg, makes a great base for fruit tarts and gallettes. I’m planning to use it for my almond carrot cake and macaroons. It’s just a matter of putting back into the almonds some of what is lost in the process of making the milk. So far, so good.
Oh my word, that is brilliant! Thanks for the suggestion!! 🙂
Thanks, Stacy! You raise a good point, and that is – when I want almond milk, I just want a pint or a quart. I almost never use up the entire half gallon when I buy it. So this is the perfect nudge for me to do it myself. 🙂
[K]
Right? 🙂 It’s nice to be able to make just the quantity you want/need. 🙂
Loved the video. Short and sweet and you make it look so easy. I’ll definitely give it a try.
What a great video! Homemade almond milk is the best. I sometimes add a tiny splash of vanilla to mine. Thanks for the reminder to go make more!